


Eric Ott - CPAP Product Specialist
Written & Edited by Eric Ott. Eric demystifies the world of sleep apnea, transforming complex information into clear, actionable guidance. Since 2021, he's been your dedicated partner in navigating CPAP therapy, crafting content that empowers you to reclaim restful nights and energized days. Eric's mission is to make your journey back to vibrant sleep as smooth as possible. Read more about Eric
Our content undergoes rigorous expert review, evidence-based research, and regular updates for accuracy.
The thought of pressurized air blasting down your throat all night probably doesn’t sound terribly appealing to most people. That’s exactly why CPAP manufacturers try to pack in as many features as possible to make therapy more tolerable and comfortable.
Some of those solutions come in the form of heated humidifiers built into the machine, Ramp settings to help you ease into therapy at night, and automatic leak compensation, but the one we really want to talk about today is EPR, or Expiratory Pressure Relief.
While there’s a lot to cover on this topic, what you need to know is that EPR is used as a catch-all term referring to the exhalation relief features found on most CPAP machines. EPR can lower your incoming therapy pressure by up to 3 cmH2O during exhalation and can be helpful if you’re still adjusting to therapy, having shortness of breath when using your CPAP, or struggling with high-pressure settings. That said, it’s always best to try to adjust to the therapy prescribed by your doctor before changing your EPR setting, as it can have a detrimental effect on your therapy in the long run.
In this article, we’re going to walk through everything you know about EPR, including when and how to use it, as well as guided instructions to enable EPR on many popular modern CPAP machines on the market today. For now, let’s discuss some of the finer details about what EPR is and how it works!
What is EPR and How Does it Work?
EPR, or Expiratory Pressure Relief, is ResMed’s trademarked name for its take on the exhalation relief feature found on most CPAP machines. Exhalation relief is an optional setting that lowers your incoming pressure level while you’re exhaling to help make breathing feel more natural and has been shown to improve therapy comfort.
(The proper term for EPR is actually exhalation relief, but EPR has evolved to be a catch-all term for this type of pressure relief feature in the same way that people use "Kleenex" to refer to facial tissue or "ChapStick" to refer to lip balm. So, for the purposes of this article, we’re going to be using EPR and exhalation relief interchangeably. If you get confused by the different terminology, just know that we’re talking about the same thing by different names.)
The exhalation relief feature on any machine will lower your therapy pressure by increments of 1 cmH2O per level to a maximum pressure relief of 3 cmH2O during exhalation. Some machines, like the ResMed AirMini, AirSense 10, and AirSense 11, even offer an option for EPR to be on full-time or only while Ramp mode is active.
So, if you’re set to a pressure of 12 cmH2O and using an EPR setting of 2, your incoming therapy pressure during exhale will drop to 10 cmH2O. If you're at 17 cmH2O with an EPR setting of 3, your incoming pressure during exhale will drop to 14 cmH2O, and so on. However, pressure relief settings will never drop below 4 cmH2O, so if you’re at 6 cmH2O with level 3 EPR, it’ll only drop to 4 cmH2O during exhalation rather than 3 cmH2O.
To help you locate the pressure relief setting on your machine, here’s a quick rundown of the names used by different manufacturers:
- EPR: ResMed CPAP Machines
- FLEX/A-Flex/C-Flex/P-Flex: Philips Respironics
- IPR: Resvent
- EZEX: Transcend
- SensAwake: Fisher & Paykel
- Reslex: 3B/React Health
- Z-Breathe: HDM/Breas
- PVA: Apex Medical
- Exhalation Relief/Pressure Relief Settings: umbrella terms referring to all of the above
We’ll show you how to track these features down with step-by-step instructions down below, but for now, we should talk about when to use EPR and when to avoid it.
When Should I Use EPR?
Exhalation relief features like EPR, EZEX, and FLEX can be helpful when used in the right situations. Most of the side effects and issues people experience along the CPAP journey can be remedied with solutions that don’t involve adjustments to your therapy pressure (which EPR is). Assuming you’ve already tried less drastic solutions to the following issues without success, EPR might be able to help you if:
- You’re new to therapy and struggling to adjust
- You have a pressure setting greater than 9 cmH2O
- You’re experiencing shortness of breath during CPAP therapy
- Your mask is leaking due to higher pressures
- You experience dry mouth with CPAP
- You’re having difficulty exhaling against the incoming pressure
- You’re waking up at night from the discomfort of continuous pressure
- You’re swallowing air and waking up gassy or bloated (CPAP aerophagia)
While your exhalation relief setting can help in these scenarios, you should still know how to use it responsibly. Some websites even recommend adjusting your EPR setting if you’re struggling with the noise from your CPAP machine, but this can only help so much and isn’t worth the cost of less effective therapy that may result.
When experimenting with your machine’s exhalation relief settings, it’s a good idea to only make adjustments in increments of 1 cmH2O at a time. While this general advice won’t apply to everyone, it’s typically better to try and adjust to level 1 EPR first over the course of a week or two. If you feel like you’re having the same issues and your AHI hasn’t gone up, try bumping to level 2 EPR, and so on.
When it comes to CPAP, most comfort features and settings options are highly subjective, and a setting that fixes one person’s problems may cascade into a whole new line of issues for someone else.
So, like any adjustment you make to your therapy, you should only make changes to your EPR setting after consulting with your healthcare provider first. A 2016 study found that EPR can actually be detrimental in some cases if it wasn’t accounted for during titration, so it’s ceratinly a feature to use sparingly.
When Should I Avoid EPR?
As we just discussed, exhalation relief can be very helpful for some people but detrimental to others. Some reasons to avoid EPR/exhalation relief settings are:
- You have a low therapy pressure (less than 9 cmH2O)
- Your AHI has gone up since turning on EPR
- You’re not having any issues with compliance or comfort
- You’re experiencing CPAP headaches after turning EPR on
- You’re experiencing mask leaks but haven’t tried a mask liner or different mask style yet
- You’re experiencing dry mouth but haven’t tried a different mask style, humidification, or a chinstrap yet
It’s not always cut and dry to know when you shouldn’t be using EPR, but thankfully, there are typically many solutions to common CPAP problems that you can try before resorting to EPR.
Prominent CPAP YouTuber TheLankyLefty27 explains that the use of EPR can actually increase your AHI, cause desaturation of your blood-oxygen levels, and even lead to central hypopneas in some people. He goes on to state that he feels confident recommending that most people should actually avoid EPR unless they absolutely feel that they need it to stick with their therapy.
How EPR Can Impact Your Therapy Negatively
Something that many people in the world of CPAP aren’t fully aware of is the role that EPAP, or Expiratory Positive Airway Pressure, plays in therapy.
The super simplified, need-to-know info here is that your airway needs help to stay open during inhalation, which is supplied by CPAP. Your airway still needs help staying open during exhalation too, and by exhaling against the incoming pressure, EPAP is generated to hold your airway open.
How to Access EPR on Your CPAP Machine
So, with all of this in mind, it’s no wonder that finding your machine’s pressure relief function might take some digging to uncover. Before showing you how to find your machine’s EPR setting (or whatever your machine’s manufacturer calls their pressure relief feature), we want to reiterate a couple of things:
- You should NEVER make changes to your therapy pressure without first consulting your healthcare provider.
- EPR/pressure relief/exhalation relief settings should NOT be considered as a first solution, and you should explore other manners of solving specific issues you might be having BEFORE introducing EPR to your therapy.
- EPR CAN help resolve specific issues in some cases, but it should NOT be treated as a general approach to therapy discomfort because misusing EPR CAN have a detrimental impact on your therapy in the long run.
That said, if you’re looking to adjust your machine’s pressure relief function, here’s how to do it depending on your device:
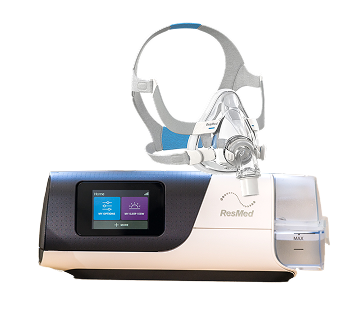
Adjusting EPR on the ResMed AirSense 10
To access the EPR setting on AirSense 10, you’ll need to:
- Press and hold the home button and selection dial at the same time for three seconds to access the clinical settings menu. Upon successfully entering the clinical settings menu, you’ll see “My Options” change to “Settings” and a new option will pop up at the top of your home screen to exit the clinical menu.
- Select “Settings”.
- Scroll down to the “Comfort” section and select “EPR”.
- Select “On” to enable EPR. You’ll automatically be returned to the settings menu after making your selection.
- Select “EPR Type”, then choose between “Ramp Only” or “Full Time”. You’ll automatically be returned to the settings menu after making your selection.
- Select “EPR Level”, then use the adjustment dial to select a setting of 1, 2, or 3.
- When satisfied with your selections, press the home button, then scroll to the top and select “Exit Clinical Menu”.
Adjusting EPR on the ResMed AirSense 11
To access the EPR setting on AirSense 11 AutoSet, you’ll need to:
- Tap and hold “My Options” and “My Sleep View” for three seconds until the menu background changes to white.
- Select “Settings”.
- Scroll down to the “Comfort” section and tap the toggle next to EPR to enable it.
- Tap “EPR Type”, then choose “Ramp Only” or “Full Time”, then select “OK” to confirm your choice.
- Tap “EPR Level”, choose between settings 1, 2, or 3, then tap “OK” to confirm your choice.
- Tap the home icon in the top left corner, then tap “Exit” at the bottom to exit the clinical menu.
Adjusting EPR on the ResMed AirMini AutoSet Travel CPAP
To access the EPR setting on your AirMini AutoSet, start by opening your AirMini Companion App, then:
- Tap the Bluetooth icon in the top right corner.
- Assuming your machine is already connected and ready to use, use two fingers to tap and hold the ResMed and AirMini icons at the top of the page for three seconds until the screen changes, welcoming you to clinical mode.
- Tap “Continue” to proceed to the clinical settings menu.
- Tap the toggle next to “EPR” to enable it.
- Tap “EPR Type”, then select “Ramp Only, or Full Time”, then select “Done” to confirm your choice.
- Tap “EPR Level”, choose between settings 1, 2, or 3, then tap “Done” to confirm your choice.
- Scroll all the way to the bottom of the settings menu and tap “Apply Changes”. A popup will confirm that settings changes have been applied, and the lights on your device should flash three times.
- After settings have been applied, tap “Exit” in the top left corner, then confirm “Exit” in the pop-up that follows.
Adjusting FLEX on the Philips Respironics DreamStation
To activate the FLEX pressure relief setting on the Philips Respironics DreamStation, simply:
- Navigate to “My Setup” from the main menu.
- Scroll to the right and select “FLEX”, then choose between a setting of 1, 2, or 3 and confirm.
If your FLEX setting is locked, try the following:
- From the main menu, push in and hold both the click dial and Ramp Button simultaneously until the menu screen changes.
- Scroll over to "Comfort".
- Make your changes to the FLEX level and type in the bottom right corner.
- Return to the main menu, then select "Patient Mode" to return to the standard view.
Adjusting FLEX on the Philips Respironics DreamStation 2
To activate the FLEX pressure relief setting on the Philips Respironics DreamStation 2, simply:
- Tap “Settings” at the bottom of your screen.
- Tap “FLEX”, then choose between “Off” or a setting of 1, 2, or 3.
- Tap “Back” to return to the home screen.
Adjusting Z-Breathe on the Z2 Auto Travel CPAP
To activate the Z-Breathe pressure relief setting on the Z2 Auto, simply:
- Press and hold the Up and Down arrow buttons simultaneously for three seconds until the screen changes.
- You should see your machine’s current mode (APAP or CPAP) with a number flashing next to it. This number is your pressure relief setting.
- Use the Up arrow button to increase your EPR setting, or the Down arrow to decrease it. Make sure not to continue pressing the Up or Down arrow, because you might accidentally change your machine’s mode (APAP or CPAP) without realizing it.
- Press and hold the middle button until you return to the home screen.
Adjusting EZEX on the Somnetics Transcend Micro
To activate the EZEX pressure relief setting on the Transcend Micro, you’ll first need to install Transcend’s miniCPAP software on your Windows computer (miniCPAP is not compatible with MacOS). Once installed, open the miniCPAP software, then:
- Connect your Transcend Micro to your computer using a USB to USB-C cable. If successful, the icons on the miniCPAP software menu will go from gray to colorful.
- Select “Configuration”.
- Toggle “EZEX Settings” on, then set the slider bar to 1, 2, or 3.
- Click “Update” at the bottom, then navigate back to the home screen using the back arrow in the top left corner.
Adjusting Reslex on the Luna G3
To adjust the Reslex pressure relief setting on the Luna G3, you’ll need to:
- Scroll to the right and select “Settings”.
- Scroll to the right again to the fourth menu option, “Reslex”.
- Push the dial in to select “Reslex”, then turn the dial to choose between 1, 2, 3, or Off.
- Press the Home button to return to the home screen.
If you’re unable to change the Reslex setting, you may need to access it through the clinical menu instead. To access:
- Scroll over so that “Settings” is highlighted, then press and hold the Home button and Selection Dial for five seconds simultaneously.
- Scroll to the right so that “Comfort” is highlighted, then push the Dial in to select it.
- Scroll down and select “Reslex”, then select “Patient”. Press the Home button to return to the home screen.
Now, you’ll be able to follow the instructions above to easily change and access your Reslex setting without accessing the clinical menu first.
Adjusting IPR on the Resvent iBreeze
To adjust the IPR pressure relief setting on the Resvent iBreeze, simply:
- Use the Selection Dial to scroll to "Comfort" and click the dial in to select.
- Click again to select the first option here, "IPR".
- Use the Dial to increase, decrease, or disable your IPR setting, then click again to confirm.
Frequently Asked Questions About EPR and Exhalation Relief Settings
What's the Difference Between EPR, IPR, FLEX, EZEX, Reslex, and Exhalation Relief?
In a nutshell, there's no real difference between EPR, IPR, FLEX, EZEX, or other pressure relief features: they're all different names for the same feature from different manufacturers. All of these settings decrease therapy pressure by up to 3 cmH2O during exhalation.
Should You Use EPR on CPAP?
You should not use EPR on CPAP when other options exist that may help you solve your problem. EPR should only be used as a last resort after other potential solutions are explored because it makes changes to your prescribed pressure setting.
How Does EPR Work in CPAP?
EPR works by lowering your incoming therapy pressure during an exhale. EPR can be adjusted between a setting of 1, 2, or 3, and the setting number corresponds to how much pressure your machine will drop (measured in cmH2O) while you’re exhaling.
What is EPR Level 1 on CPAP?
EPR level 1 equates to a 1 cmH2O drop in incoming airway pressure when exhaling. EPR can be adjusted up to level 3, and each level equals another 1 cmH2O drop in therapy pressure up to a maximum drop of 3 cmH2O.
Is It Illegal to Change CPAP Pressure?
No, it isn’t illegal to change your CPAP pressure setting, but for safety reasons, it should only be done with the supervision of your healthcare provider.
Final Thoughts
Well there you have it, a comprehensive guide to EPR, exhalation relief, and pressure relief settings on CPAP. So, what did we learn?
- EPR, while technically the trademarked name of ResMed’s version of exhalation relief, is recognized as a catch-all term referring to pressure relief settings found on most CPAP machines
- EPR can be effective in increasing comfort and compliance in people who are new to CPAP
- EPR can be an effective solution to common CPAP problems, but should only be used as a last resort after other solutions are explored
- If you decide to give EPR a shot, start with the lowest setting and work your way up after giving yourself a few nights to adjust to each level
- EPR can lead to an increase in AHI and central apneas, so you should only make changes to it after consulting with your healthcare provider
We hope this article has helped you reach a better understanding of EPR and other pressure relief settings. If you have more questions about EPR or anything else you might experience during your CPAP journey, don’t hesitate to reach out to our expert customer service team!