


Do you think you may have sleep apnea? If you suspect you do and are like most people, the idea of getting tested in an overnight sleep lab can feel intimidating. Luckily, advancements in technology have developed alternatives to in-lab sleep studies that can detect not only the three different types of sleep apnea but also other sleep disorders. In this article, we will help you prepare for a home sleep test (HST), which is also commonly known as a home sleep study or at-home sleep study.
Benefits of an At-Home Sleep Study

There are numerous benefits to conducting a home sleep study. The main benefit is that it’s convenient since it’s done from the comfort of your own bed rather than in a medical facility. With an at-home sleep study, you don’t need to spend the night in an unfamiliar setting where you may have difficulty falling or staying sleeping. It may also be less expensive than a lab test, though this varies based on health insurance benefits. If you have decided to do an at-home sleep study, below is what you can do to make sure your test goes smoothly.
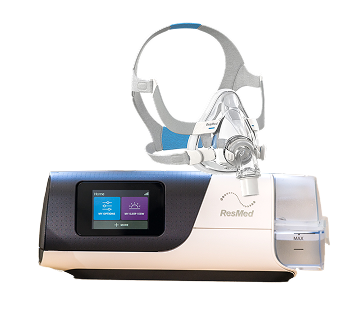
Sleep Well, Live Well
Our home sleep test brings expert diagnosis right to your doorstep, so you can start your journey back to the vibrant world of great sleep.
No labs. No wires.
Just sleep.

Step One: Before Deciding on an At-Home Sleep Study
One of the biggest considerations before deciding whether or not an HST is right for you is to discuss your health history with your doctor, including any past procedures, current medications, and any existing health conditions. Depending on your health history, your doctor can help you make the decision on what test is best for you!
Step Two: The Day Before Your Home Sleep Study
If you decided on the home sleep study, your doctor can help you pick a home sleep study device that is compact, light, and simple-to-use for easy self-administration. You’ll typically receive:
- Chest Electrodes (Soft Electrodes That Rest on Your Skin)
- A Small Finger Oxygen Sensor
- A Chest Belt to Measure Your Breathing
- A Nasal Cannula to Determine Your Airflow (Comparable to an Oxygen Mask)
All of these sensors are hooked up to a small device, which is about the size of a smartphone. The machine records your sleep data. It’s a good idea to understand the equipment and how to set it up the night before you do the at-home sleep study, so you are familiar with the process. Double-check how all the equipment works and how it should adhere to your body. That way, if you run into any issues or have any last-minute questions, you can get them answered before you start the test. Also, check what to do the next morning after your test to confirm the proper removal of the equipment.
Step Three: The Day of Your Sleep Study
Your doctor may recommend you discontinue any medication you regularly take to ensure accurate results. Otherwise, treat the day as you would any other but with a few modifications:
- Do not nap during the day.
- Do not consume caffeine or sugary drinks after lunch.
- Do not consume any alcohol altogether as it can interfere with the test results.
- Do not eat too late or too much at dinner.
- Do not apply any lotion before bed if you normally do. This may cause any equipment that needs to adhere to your skin to either not adhere or detach during sleep.
- Take a relaxing bath before bed.
- Avoid blue light before bed.
When you are ready for bed, refer back to the instructions you read the night before and follow them to setup the equipment correctly. Some at-home sleep study devices have velcro-secured belts that need to be placed in certain areas, so ensure these belts are in the proper position and fastened. If there are sensors that need to be aligned, make sure they are adjusted properly. Keep an eye out for any lights on the device that may point to any malfunctions. Your equipment likely came with troubleshooting instructions that will help you resolve some easy-to-solve issues. Typical problems include improperly fastened or adhered equipment that is causing the device to not accurately track what it needs to measure. Another commonly seen issue is a low battery. Most devices are powered by either a AA or AAA battery. Your test provider will normally have a brand new one in your device, but in the rarity they did not or you simply got a bad battery, you may have also received back-up batteries. If you can’t easily resolve the problem with the included troubleshooting instructions, contact your test provider and avoid trying to repair other problems yourself as you may permanently damage the device. After everything is set up properly and in working order, you can go to sleep as you would in the position that is most comfortable. If you need to use the restroom in the middle of the night, simply go as you normally would. You won’t need to turn off or remove the device from your body—the device will sense a pause in sleep activity and either exclude that data from the final report or your health provider will know how to interpret the data accordingly.
Step Four: The Next Morning
Remove all equipment per the instruction booklet and double-check that the sleep study was recorded successfully. If you had a good night's sleep, you are now ready to package up the equipment and send it back to the provider. If you feel you didn’t sleep well (i.e. you only slept for four hours or woke up at three in the morning and couldn’t fall back asleep), contact your doctor or the sleep lab who furnished you with the equipment. They may recommend you use it for a second night.
Step Five: The At-Home Sleep Study Results
Most sleep study results will be reviewed and analyzed in a matter of days. Sleep specialists are generally checking airflow pressure, Respiratory Inductive Plethysmography (RIP), blood oxygenation, sleep apnea event detection, total sleep time, and more. Though rare, your home sleep study may be inconclusive or another disorder is suspected. In those cases, your doctor may prescribe an overnight sleep study at a sleep lab as a follow-up. Read the guidelines that the American Academy of Sleep Medicine (AASM) recommends to diagnose sleep apnea using an at-home sleep study. When you receive your sleep apnea results, make sure you ask your doctor any questions you may have. Getting answers to these questions will be the basis of a successful transition into sleep apnea therapy.